Hello! Thanks for visiting my blog.

I am on a blogging hiatus as I would like to focus on my jewelry craft work. Hence, I will not be taking in requests for reviews of any nature in the future. If you do have queries on my jewelry work instead, please get in touch via email : oon.adeline@gmail.com
Showing posts with label recipe. Show all posts

Wednesday, February 8, 2017

[Recipe] Easy Pizza Dough


Many apologies for the long hiatus on the blog! It has been really busy the past 2 months on the jewelry crafting front since having to cater to the year end gifting orders and right after it was for the Lunar New Year. I wish I had more time to stop and smell the roses but well, busy is good too! Truth be told, I have never been busier!

Anywayyyyy, the cooking at home still has to go on, despite the achy shoulders and back - my occupational hazard. And I really felt I needed to check into my blog to let y'all know that I am still around so I took the some time off last night to write this down. :)

I wanted so much to share this 2 ingredient no-rise pizza dough recipe I discovered from The Slow Roasted Italian. Like many others who blogged about this recipe, I too felt very skeptical about how this dough will turn out. I went ahead to try it anyway... half of me expecting it to fail and preparing to call for pizza delivery. But surprise surprise! It turned out wonderfully crisp on the edges and not at all soggy. It almost felt like we were having gourmet pizza! Definitely a must-try if you ever thought that it is too difficult a task to prepare a pizza dough. 

Preparation time : 10-15 mins   Yield : One 12" and One 9" base pizza  Serve : 2-3 pax

Ingredients :
1 cup self raising flour + 1/2 cup more for later
1 cup greek yoghurt
(that's it! really!)

Method :
- Set oven to 200 degrees celcius.
- Combine the flour and yoghurt together in a large mixing bowl
- Use an electric mixer with dough hook (mine is handheld)
- Knead on medium speed for about 5 minutes
- Gradually add more flour from the other 1/2 cup, as necessary until the dough comes together

Pardon the photo quality as I don't have fantastic kitchen lighting.

- Instead of kneading the dough on the counter top,which can be a messy affair, I kneaded the dough directly from the bowl for a few rounds, sprinkling more flour on it as necessary, until the dough doesn't stick to your hands when you pull away.
- I used a 12" pizza pan with holes at the bottom and another 9" round baking pan. Spray a light coat of olive oil on the base of the tray before placing the rolled out dough on it.
- You can either roll the dough out on a flat surface with a rolling pin or as I did, I took slightly more than half the portion of the dough and placed directly on the pans, then used my hands to spread the dough to the edge. In fact you can also shape it as desired!

This is the uncooked pizza, with cheeses, tomato based sauce and pepperoni. You can add any of your favorite toppings!

- Bake the pizza for 12-15 minutes, until the edges look crisp and the toppings are browned.
- Slice them up into portions, add wild rockets on top (mmm our favorite!) and serve!
- Enjoy!


Till the next post, have a wonderful day!

Absolutely Me,

Wednesday, December 7, 2016

[Recipe] Baked Cajun Seafood in a Bag


As I am winding down to my year end break, I have found some time this morning to write and share my successful dinner recipe we had last night - in celebration of my husband's birthday. It was absolutely a happy meal for us! 

This recipe of 'Cajun Seafood in a Bag' is simple enough for anyone to master and best of all, it is so much more cost saving having this at home versus eating at a specialty restaurant. (The seafood cost me slightly less than $30 only) This is also a great feast to share when we gather for a communal meal with family and friends at home. Except for the slight unglamorous manner eating them with your hands.

The only thing one may find challenging (or maybe it is just me) is handling and cleaning the raw crabs. If you are a noob at cleaning crabs, check out this video of how it can be done. Tip : actually, it can be made simpler with a good pair of scissors instead of picking the stuff inside the crab with fingers. You know... if you don't want to feel icky about it.

I have used flower crabs for my recipe. Just so that I don't have to handle live crabs! But please feel free to substitute it with mud crabs if you like or perhaps something easier would be cray fish which I didn't manage to find. Any assortment of seafood can also be used for this dish and it is lip smacking delicious, I tell you! The slight buttery and peppery flavor with the natural sweetness from the seafood is so so good!

This recipe is inspired by Cuisine Paradise.

Preparation time : 15 mins | Cooking time : approx.30 minutes | Serves : 3 adults

Ingredients :
- 2 large flower crabs : cleaned and quartered
- 6 large tiger prawns : with feelers snipped off
- 400 grams fresh clams : washed and cleaned
- 2 medium sized squid : cleaned and sliced to rings
- 1 sweet corn on cob : cut into 6 portions
- 1.5 tbsp of butter, cubed
- fresh parsley for garnishing

Seasoning :
- 1 tbsp cajun spices (check out McCormick brand)
- 1/2 tsp smoked paprika
- 1/4 tsp ground black pepper
- 1/4 tsp of salt
- 1/4 cup of white wine (optional)

Items you need to wrap the seafood in :
- 1 large piece of parchment or baking paper (this is to hold the juices in place)
- 1 large piece of foil paper
(Please use your discretion with the sizes of wraps to fit the seafood in it)

Method :

- Preheat your oven to 190 degrees.

- After cleaning and cutting the seafood into it's portions, layer the foil paper, followed by the parchment paper on a base of a large oven safe deep dish. If you don't have a large one to fit all the seafood in a bag, you may consider splitting the portions into 2 bags.

- Arrange the seafood onto the parchment paper and proceed to add all the seasoning onto the seafood. Give the seafood a good toss with your hands and top it of with butter.


 - Wrap and fold the ends of the foil together to form a bag. Don't worry if it's not large enough to fold over. Just use another piece of foil paper large enough to secure the top. The idea is to keep the cooking sealed without drying out the content.

- After 30 minutes, take out the bag and check to see if your seafood is cooked. If you are unsure, put it back into the oven for an extra 10 minutes. You can also probably tell when you smell the cooked seafood aroma in the air. 

- Garnish the seafood with some fresh chopped parsley before serving.

- Enjoy!

Till the next post, have a wonderful day!

Absolutely Me,

Wednesday, October 5, 2016

Eggplant with Minced Meat and Salted Fish


One of the joys I have is cooking for my family. The fun part is trying to sieve out the flavors of the food that we like while eating out so that I can try to replicate it at home - of course sometimes, I can't do it without some help from the internet!

I was inspired to cook this dish at home after we tried it at a Chinese restaurant. The portion was very small and couldn't satisfy our meal that night so I knew I had to try cooking this. So glad when I see my husband and son ply the eggplant onto their plate of rice repeatedly. It is a good standalone dish. Best part? It is not a daunting dish to prepare at all. (Recipe adapted from The Meatmen)

Preparation time : 10 minutes  Cooking time : 10-12 minutes  Serves : 4

Ingredients :

2 medium size long eggplant (about 1/8-1/4 longer than the size of a palm)
80-100 gm minced meat (I used pork. Minced chicken would work too.)
2 slices of dried salted fish (about 20-30 gm)
1 tbsp minced garlic
1 tbsp minced ginger
Some spring onions, cut into small pieces
Some oil for cooking
Corn flour

Sauce :
a) 1 tbsp oyster sauce
b) 1 tsp light soya sauce
c) 1/2 tsp black soya sauce
d) 1 tsp black vinegar
e) 1 tsp soy bean paste 
f) 1 tsp sugar
g) 1 tbsp shaoxing wine
h) 1 tsp corn flour mix with 1/4 cup water to thicken sauce

Method :
- Firstly, slice the eggplant into wedges and lightly coat it with corn flour.
- Heat your pan with about 3 tbsp of cooking oil, pan fry the eggplant (or deep fry if you must) till slightly soften and browned. Drained and set aside.
- Rinse and cut the salted fish into smaller pieces.
- Prepare a fresh pan with 2 tbsp of oil. Stir fry the salted fish, garlic and ginger till fragrant.
- Add the minced meat, give a good mix and fry till cooked.
- Add the sauces from the above list (a) - (g). Mix well.
- Add in the eggplant and let it stew with the meat for a few minutes.
- Add in the cornflour mix to thicken sauce.
- Add the spring onions and give a final stir.
- Serve and enjoy with piping hot white rice!


Till the next post, have a wonderful day!

Absolutely Me,

Tuesday, September 6, 2016

Babi Masak Assam or Tamarind Pork


If you do a google search for this peranakan dish recipe, you will see different versions of it. I learned mine from my mother and have asked her how some recipes I came across called for lemongrass or kunyit (tumeric). She dismissed my questions, citing that it was a much simpler recipe that she learned from my mama - how I greeted my paternal grandma, who was a true blue nonya. I love my mum's cooking so of course, I had to follow hers! It is the reason why I love this dish very much.

If you are not familiar with this dish, let me tell you that it is a VERY appetizing dish because of the assam juice. Just by looking at the photo sends me salivating! The result should be a very tender meat dish. My family enjoys it and it usually is gone before I can go for second helping. It really whets the appetite and is even better when you drizzle the gravy on your rice! 

The green chillis added to this dish, is not at all spicy. It somehow, adds a different dimension to the flavor of this dish. For me, it is definitely the highlight! (Because the kids won't eat the chillis so I get to eat more!) But of course, if you are concerned that your children might be sensitive to the green chilli taste, please omit it, though you may be missing out on a special flavor. :)

Preparation time : 10 mins  :  Cooking time : 1 hour  :  Servings : 4-5

Ingredients:

- 500 gram twee bak or pork shoulder, sliced.
- 1 soup bowl tamarind or assam juice from 3 tbsp tamarind pulp (see below for how-to)
- 2 tbsp fermented soy bean paste (tau cheo)
- 1 tbsp minced garlic
- 4 to 6 green chilli, de-seeded
- 1 tbsp brown sugar (or regular sugar if you don't have this)
- 2 tbsp cooking oil

 Method :
- prepare the tamarind juice by soaking the pulp in 1 soup bowl of hot water for a while. Then strained into another bowl by pushing the softened pulp through a sieve. Set aside.
-  Heat the oil in frying pan on medium heat. Add garlic and bean paste. Stir fry till fragrant.
- Add the pork and mix it well with the paste. Fry for a few minutes.
- Add the tamarind juice and green chillis. Lower heat and let it simmer for about an hour. By then the gravy would have slightly reduced and thickened.
- Add the brown sugar. Do a taste test for the level of tang you like.
- Serve with white rice.
- Enjoy!


Till the next post, have a wonderful day!

Absolutely Me,

Wednesday, July 20, 2016

Watermelon Cooler


The weather has been really hot and humid lately. You know it. When it reaches it's peak especially in the afternoon, all I dream of is plunging into a swimming pool and soak myself silly in the cool water for as long as I can. But the public pool is not very near where I live and I figure that by the time I decide to pack and go, I would have completely lost interest in wanting to go there in the first place!

While surfing through wonderful inspirational photos on pinterest the other day, I came across plenty of delicious-thirst-quenching watermelon coolers which would totally mimic a trip to the pool. (excuses, I know) So I told my husband that hey! I'm gonna make us some tomorrow! He was all for it!

There are so many variations of a watermelon cooler out there so I decided to do the simplest one, just to try it out. This is an adult drink, as I have added rum in it. But it's always an optional step if you want to make it for the kids.


Preparation time : 4 minutes  Serves : 2

Ingredients :
- seedless red watermelon, sliced into chunks and chilled (3 cups)
- 3 calamansi lime juice (or 1 more if you like the lime flavor!)
-1/4 rum (optional)
- A little sugar to taste (or your preferred sweetener)

Method :
Place the watermelon chunks, lime juice and rum into a blender and blitz till smooth. Add sugar to taste and another round of quick blitz, if needed.

Serve and be quench-i-fied!

Till the next post, have a wonderful day!

Absolutely Me,

Monday, June 6, 2016

[Recipe] Spaghetti Tossed with Roast Chicken Shreds

I have always been a fan of easy one dish meals - unless there are specific requests to satisfy cravings. Bee hoon, pork teppenyaki, "claypot" chicken rice, chicken chop hor fun, chicken stew, hokkien mee, oyaku don and the usual fried rice are just my kind of typical one dish meals that I cook frequently.

I roasted a chicken just the other day, typically to shred it and pair it with spaghetti in tomato based sauce. Instead, I decided to try using the juices left from roasting the chicken and toss it with spaghetti. It turned out to be a very hearty and savoury one dish meal!


Preparation time : 15 minutes  Cooking time : 1 hour 30 mins  Serves : 4

Ingredients :
- 1 whole chicken, halved for easier handling when roasting
- 1 large carrot, sliced
- 2 medium sized onions
- 4 tomatoes, sliced
- 1 packet shitake mushrooms, sliced
- 1 cup fresh milk (this is an important ingredient to ensure the chicken doesn't dry out while roasting and it aids with a flavorful, caramelized sauce)
- 1/2 a bottle of Red wine and garlic marinade (see picture below)
- Mixed dried herbs (optional)
- Salt and pepper to taste
- 3/4 packet of spaghetti

Method :

  • set oven temperature to 180 degree celcius.
  • Slice all the vegetables and place them in a deep oven pan.
  • Then marinade the chicken and leave it for about half and hour to absorb the flavors, before putting it on top of the vegetables. Add milk in the tray. At this point, I also added the mixed herbs for extra fragrance.
  • Place the tray in the middle tier of your oven and start roasting it for about 1 hour 15 minutes.

  • When it's done, take it out and place the chicken on a separate plate so that you can use the juices from the roasted chicken.
  • When the chicken has cooled down, hand shred the chicken meat. (And keep the bones for cooking soup the next time!)
  • Cook the spaghetti, as you would and then placed it into the tray and toss it well with the vegetables.  If you are not serving it straight away, make sure you heat up the vegetables and it's juices before tossing the spaghetti in.
  • Serve it hot and enjoy a simple and very heart-warming dish.

Till the next post, have a wonderful day!
Adeline

Thursday, April 21, 2016

[Recipe] Steam Herbal Prawns


Traditionally, many would identify this dish as drunken prawns. But this applies at restaurants where live prawns are being tossed in chinese wine and cooked straight away. This is certainly unthinkable when cooking at home. In my home, at least!

One of the best ways to replicate drunken prawns is by steaming. This is the easiest and fastest dish to prepare, may I add, a healthy and impressive one too! Just make sure that the prawns are really really fresh.

I've tweaked the soup base a little by adding some chicken stock, instead of just 100% chinese wine (Shaoxing wine or hua tiao chiew), so that my daughter can enjoy the soup. She's a soup fanatic!

Preparation time : 5-10 mins  |  Cooking time : 10 mins  |  Serves : 2-3

Ingredients :
- 8 to 10 medium/large fresh prawns
- 1/4 cup hua tiao chiew (or make it 1/2 cup if you are not adding chicken stock)
- 1/2 cup chicken stock (optional)
- 1 medium slice dang gui a.k.a. angelica root*
- 1/2 a tbsp of goji berries or wolfberries

*If you like a stronger herbal flavor, you can add another slice of dang gui. May get a little bitter though!

Method :
- in a small bowl, soak the angelica root and goji berries in chinese wine, so that the herbal flavor will be infused in the wine. 5 - 10 minutes would do.
- wash the prawns and trim the tip of the heads and legs.
- lay the prawns in a shallow plate, without overlapping each other.
- In a wok, bring the water to a boil, then reduce to simmer before placing the plate of prawns in.
- Pour the bowl of wine on top of the prawns, together with the chicken stock, then cover to steam for 10 minutes.
- Serve and enjoy!


Till the next post, have a wonderful day!

Absolutely Me,

Tuesday, March 15, 2016

[Recipe] Hasselback Potatoes


It was purely out of doubt that made me decide to try out making hasselback potatoes. Clearly, that doubt has benefited the family's love for yet another potato dish we could enjoy at home! Crisp on the outside and creamy on the inside. It's almost like having gourmet potato chips!

This recipe is adapted from Food Network


Preparation time : 5-10 minutes  Cooking time : 45-60 minutes 

Ingredients :
- 2 medium sized potatoes, washed and cleaned (with skin intact)
- 2 tbsp olive oil
- 1 tbsp butter
- 1/4 teaspoon salt
- black pepper (to taste)
- cajun powder (optional)
- spring onions for garnish

Method :
-  heat oven at 180 degrees
- thinly slice the potatoes but do not cut through the bottom
- place the potatoes on a shallow baking pan and rub the potatoes through with olive oil and salt.
- bake the potatoes for 30 minutes
- after 30 minutes, take out the potatoes and then baste it with butter. Making sure in goes into the crevices of the potatoes.
- Scatter (lots of) black pepper and some cajun powder for flavouring.
- send it back into the oven and continue baking till crisp for another 30 minutes.
- Once done, garnish with chopped spring onions and serve immediately.

A week after I tried out the above basic hasselback potatoes recipe, I took a step further and stuffed bacon into the crevices of the potatoes! It was simply too good to be true.


Till the next post, have a wonderful day!

Absolutely Me,

Thursday, February 11, 2016

[Recipe] Clam Miso Soup


This must be one of my favorite kind of miso soup to order when we dine out at Japanese restaurants. It is guilt free, absolutely heart-warming and definitely slurp worthy to have at the comfort of your home.

I have adapted this recipe from Nami of Just One Cookbook, who shares an extensive recipe for anything Japanese. She's definitely my favorite blogger for easy and trusted Japanese recipes. If you have not already tried preparing baked tonkatsu, you should definitely check out this oil-free recipe!

In this recipe sharing, I have omitted dashi kombu seaweed since I didn't have any on hand. You can always use dashi powder too or in my case, I chose to use chicken stock instead. I have also added ingredients like enoki mushrooms and tofu which makes the soup an awesome standalone meal on it's own. (Psst... I also think adding tang hoon - glass vermicelli - will be equally yummy!)

Preparation time : 30 minutes  |  Cooking time : 5-8 minutes  |  Serves 4 portions

Ingredients :
- 250 grams fresh clams (I've used venus clams)
- 2 cups water
- 1 cup chicken stock
- 2.5 tbsp miso paste
- 100gms enoki mushrooms (optional)
- 1 standard packet of soft tofu (optional)
- 1 sprig spring onions (sliced for garnishing)

Method :
- Wash and clean the clams.*

*[Simply place the clams in a clean bowl of water, add about a tablespoon of salt and let it soak for an hour or so. Take clams out from water instead of draining it, since the grits may have accumulated at the bottom of the bowl which you don't want to re-introduced back into the clams. Use a brush to clean the shells and rinse the clams in clean water again before cooking.]

- Bring the 2 cups of water in a pot to a boil before putting in the clams. Then lower temperature.
- When scum appears, use a ladle to skim it off. Add the chicken stock.
- Once the clams are open, take them out and place them in a bowl. Discard those that are unopened.
- Add the enoki mushrooms into the pot and let it cook for a minute or so. Turn off heat.
- Dissolve the miso paste into the pot in portions. This is so that you can adjust the amount of miso to put into the soup, that may differ in level of saltiness. Do add the portion of miso paste according to your taste.
- When you are ready to serve the soup, heat the pot but do not boil miso soup as it will lose it's flavor.
- Place the clams separately in bowls, with portions of tofu and enoki mushrooms. Scoop the soup into bowl and top it off with spring onions.
- Serve and enjoy!


Till the next post, have a wonderful day!

Absolutely Me,

Monday, January 18, 2016

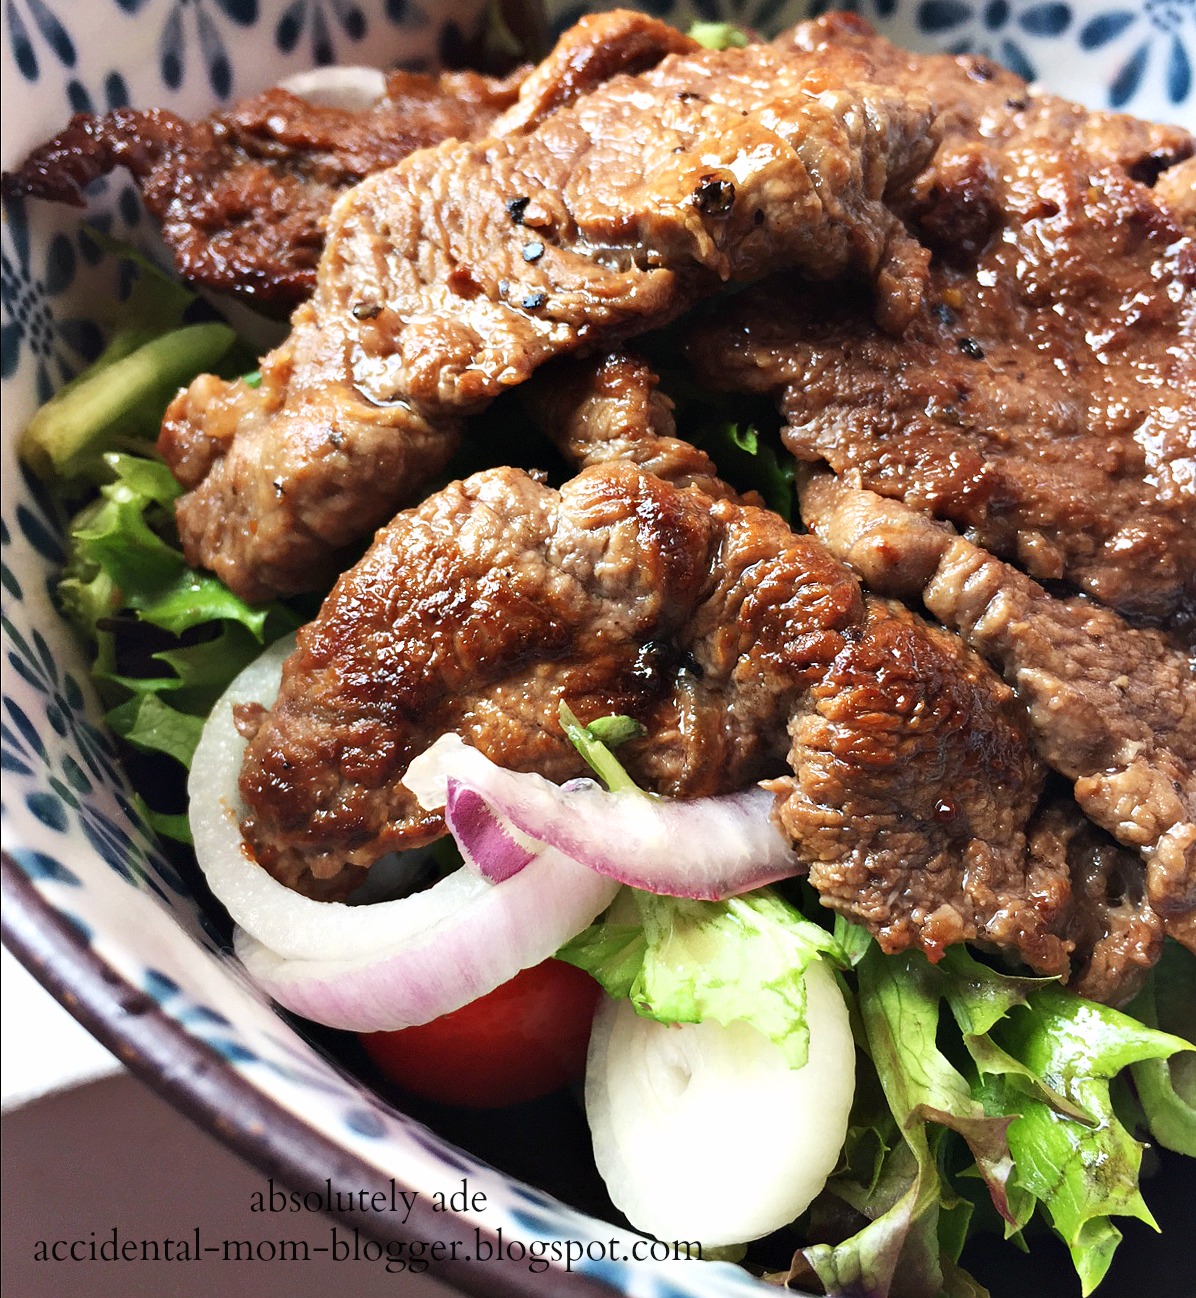
[Recipe] Meal-for-1 : Cold Beef Salad


Do you make resolutions when it's the new year? Do you seriously keep them? I don't, for sure. Because it's tough! I would rather make small changes to improve my life on a daily basis whenever possible. And one of those, right now, is to be more conscientious with what I eat.

During a family vacation in Sydney last year, I have had several beef salad lunches which were tangy and delicious! So I have been preparing my version of cold beef salad for my solo lunches at home of late. This is also a very ideal healthy lunch you can prepare in advance from home to bring to office and good for anemic people (like me) who needs a good dosage of iron in our diet.

Preparation time : 15 minutes  |  Cooking time : 5 minutes  |  Yields : 1 portion

Ingredients for beef marinade :

- About 160gm beef chuck tender, sliced thinly (Or get the pre-packed sliced beef at the supermarket)
- 1 tbsp Red wine vinegar (or balsamic vinegar)
- 1 tbsp olive oil
- 1 tbsp soy sauce
- 1/2 tbsp BBQ sauce (optional - you can replace this with worchestire sauce)
- 1 tsp sugar
- black pepper to taste

Salad :
- 1 portion ready mixed salad with cherry tomatoes and (optional) onion slices

Salad dressing :
- 1/4 cup red wine vinegar (or balsamic vinegar)
-  1 tsp honey
- 1/4 cup olive oil
- salt and pepper to taste

(I personally like tangy flavored dressing. Please adjust and test-taste the portion of the vinegar to your preference)

Method :
- Marinade the beef with the all the above. Leave it in fridge for about an hour or two.
- Prepare the dressing beforehand by mixing the above dressing ingredients well. 
-  Heat pan and sear the beef on both sides for about 1 minute on each side. No need for additional oil.
-  You can choose to chill the beef to have the salad later or serve it warm on top of salad, together with dressing.
- Enjoy!


Till the next post, have a wonderful day!

Absolutely Me,

Saturday, December 5, 2015

[Recipe] Irish Cream Tiramisu

It's the year end again! Time really passes by quickly, especially when you are constantly busy with work - jewelry making, taking care of the family and never ending house chores, in my case. Of course, then there are the frequent cooking and baking experiments that takes place often in my kitchen as well.

I have been thinking of making tiramisu for the longest time. Like, more than a year ago was how old that thought was! So one fine day, after sourcing through the hundreds of internet recipes, I finally settled on trying this one by one of the renowned chefs that inspires me - Nigella. Best of all, I was going to make this tiramisu to surprise my husband for his birthday. Nothing beats having a reason to make dessert!


In this recipe sharing, I have halved Nigella's original Irish Cream Tiramisu recipe and used a 6 x 6" square glass dish. This portion is good for 4-6 persons.

Preparation time : 15-20 mins

INGREDIENTS

 2 sachets of instant coffee powder (without sugar), dissolved in 175ml of hot water. Leave to cool.
(Nigella used instant espresso powder. While I used instant cuppucino powder which I had in my cupboard)

100ml Bailey's

8 pieces savoiardi biscuits (or lady fingers)

1 large egg (60 gm)

30 grams caster sugar (reduced)

250 grams mascarpone cheese

1.5 tsps cocoa powder 


METHOD

- Once the coffee has cooled, mix it with 75ml (3/4 portion) of Bailey's in a shallow bowl.
- Dip the biscuits on each side in the coffee mixture and line a layer of them at the bottom of your glass dish. Do note that the dipped biscuits should not be too soggy otherwise you will a have problem lining them neatly on your dish.
- Separate the egg white and yolk into bowls.
- Whisk the yolk with the caster sugar till it thickens and looks pale yellow.
- Fold in the remaining Bailey's and the mascarpone to yield a mousse like texture.
- Whisk the egg white till thick and frothy. Fold the egg white into the mascarpone mixture.
- Spread half of this mixture on top of the layer of biscuits.
- Repeat with another layer of biscuits dipped in the coffee mix.
- Spread the rest of the mascarpone mixture on top.
- Cover the dish with cling wrap and leave it in the fridge overnight before serving.
- When ready to serve, dust the cocoa powder on top of the tiramisu with a small strainer.

And there's my feeble attempt at a handmade heart shape design on the tiramisu!

I am extremely relieved when my husband gave me the thumbs up on my first attempt with tiramisu! And I am super super stoked to be making this again for a year end merry making gathering with family and friends. This is definitely one of my to-do fail proof dessert for parties. Try it!

Close up shot of the tiramisu layers. Can you taste it yet?


Till the next post, have a wonderful day!

Monday, November 9, 2015

[Recipe] Fish Maw Soup with Meat Balls


This is the kind of simple soup that I grew up with. The peranakan style soup! When my mom cooked it, it usually only consists of meatballs, herh pio (fish maw) and cabbage. In recent years, we have both added fishballs into the soup so that the kids have an additional item to have on their plate of rice, though more likely because they don't eat herh pio! (Kids these days have very different taste!)

The extra condiment to have with this soup would be sambal belachan (fermented shrimp paste chilli). We would dip the meatballs into the sambal that goes extremely well, mixed with a little bit of dark soya sauce and lime, for the extra appetizing kick!

Preparation time : 15 minutes  Serves : 4  (Yields approximately 12 meatballs)

Ingredients :
- 1 large piece of fish maw (about 50-60 grams)
- 200 gram minced pork
- 1.5 tbsp ready made fish paste
- a small piece of black fungus (optional)
- half a portion of small cabbage, sliced into pieces (about 180 grams or add more if you prefer)
- a packet of fishballs (optional)
- 1 tsp light soya sauce
- pepper

Soup base :
- 3 cups of chicken stock (I used Swanson brand)
- 2 cups of water
- some fish sauce to taste  (optional)


Method :
- Blanch the fish maw in hot water, soak till soften. This also helps to rid the excess oil. Once soften, remove from water and slice into pieces. Set aside.
- Soak the black fungus till soften and cut into small pieces.
- Mix the minced meat, black fungus and fish paste together. Add the light soya sauce and pepper. Mix well and set aside.
- Bring the chicken stock + water to a boil.
- Scoop out the meat with a spoon and shape into a round ball, slightly larger than a fishball size. Or use your hand to form the meatball. Place it into the soup stock.
- Then add the cabbage, fish maw and fishballs.
- Let it cook for 20-25 minutes, or till the cabbage softens.
- Add some fish sauce to taste.
- Garnish with spring onions, fried onions and serve with sambal belachan.
- Enjoy!


Till the next post, have a wonderful day!

Monday, September 21, 2015

[Recipe] Dry Mee Siam


My mum makes the best nonya style mee siam. It's true! Those who have tried it would vouch for it. She learnt to cook it from my mama (how I called my paternal grandmother), who is a true blue peranakan. Very naturally, it's also one of my favourite childhood dishes - because I really really like my bee hoon (vermicelli). And I am very happy that I have kept this recipe in my notes section of my phone all these years. Yes, I jotted down the recipe while I was out with her for lunch one day. Though it's only this year that I experimented cooking dry mee siam instead of the original mee siam with gravy.

Just like my mum, many things that I cook usually have no particular measurement of ingredients as we learn to adjust the flavors etc. to our taste while cooking. But after cooking this dish twice already, and getting the consistency right with correct proportioning, I am ready to share the recipe which a few have asked about. One other thing to note is that I am making this fast and easy with the rempah (blended spices) using pre-made ingredients so no blending or grinding is necessary here.

Preparation time : 20-35 minutes  Cooking time : 10 minutes  Serving portion : 4

Ingredients to prepare :
- 1/2 a packet of bee hoon, cooked
- 12 pcs of medium sized prawn, boiled with shell on. Set prawn stock aside. De-shell the prawns.
- 10 stalks of chives, sliced to finger length
- 1 rice bowl of bean sprouts, optional (I didn't use it in mine as I foresaw there will be leftover mee siam for breakfast, and you can't keep it overnight with bean sprouts as it will spoil)
- 4 pcs of puffed fried bean curds, sliced (or you can use firm beancurd, a.k.a.tau kua)
- 2 eggs, for omelette
- 4 calamansi lime

For the sauce :
- 3 cloves of garlic, roughly chopped
- 1 bowl of prawn stock
-1 tbsp fermented soya bean paste (tau cheo)
- 1/2 tsp fermented prawn paste or belachan (ready made from bottle)
- 1 tbsp dried chilli paste (ready made from bottle)
- 1bowl of tamarind juice (or assam juice, derived from about 1 tbsp of tamarind paste)
- 1 tbsp coconut cream
- 1 tbsp brown or white sugar
- 1 tbsp cooking oil

Cooking steps :
-  fry up the omelette first and set aside. You can sliced it into strips when it's cooled down.
- using the same wok/pan, heat up the cooking oil.
- stir fry the garlic, taucheo, chilli and belachan paste together for a few minutes till fragrant.
- add the tau pok and chives and continue to stir fry for 2 minutes.
- add in the prawn stock, tamarind juice, coconut cream, sugar and let it simmer for 5 minutes.
- Turn off the heat and mix in the bee hoon. Mix well so that all the sauce is fully absorbed into the bee hoon.
 

Your dry mee siam is now ready to be garnished with prawns and egg strips. Don't forget to squeeze the calamansi lime on your mee siam before serving! 


Enjoy!

Till the next post, have a wonderful day!

Thursday, August 27, 2015

[Recipe] Chinese Rojak Dipping Sauce and Where To Get That DriedCuttlefish


If you love the flavors from our Singapore rojak sauce, and you have never tried making it at home, maybe it's about time!

However, before I go on with the easy peasy recipe, I would like to share the story of my hunt for dried cuttlefish to panggang (grill), you know, those that you find at the Chinese rojak stalls and served with you char kway (Chinese cruller or fried dough stick). So I did an internet search for it and found out a very likely source that may be selling it. 

Off I went in search for Chai Wee Cuttlefish, located at Blk 335 Smith Street, #02-65, Chinatown Complex (the shop is within the hawker centre) But I was disappointed that even though they sell freshly made caramelized, crispy cuttlefish snack, they were not allowed to sell me the dried ones. Though through the kind lady boss, she directed me to their supplier that would be able to sell me some. Funnily, I was really excited!

The very yummy crispy cuttlefish by Chai Wee Cuttlefish. Go support them!
Finally, I got my hands on the dried cuttlefish at Tungsan Food Industries. Because they are one of the major food suppliers' for hawkers and restaurants, I had to buy the cuttlefish in a BIG PACK of 1kg, no less. It costs $48, if I remember correctly. And no lah, I can't possibly finish this pack alone! I will be sharing some portions with friends and hopefully share some pungent smelling good time at a BBQ gathering soon. 

*Psst by the way, it takes about a minute to grill the cuttlefish to crisp in oven at a 180 degree setting. Leave the oven door slightly ajar while doing so else it may create a lot of smoke in the oven.

It's a lot of dried cuttlefish in here! Good thing I can keep it refrigerated.

You can find their retail branches and drool over what they sell at :

Ang Mo Kio Branch
Blk 554 Ang Mo Kio Avenue 10
#01-2034
Singapore 560554

Bedok Branch
Blk 539A Bedok North Street 3
#01-475
Singapore 461539

Ok I shan't go on about my cuttlefish shopping adventure! Here's the simple recipe you can make for your rojak dip if you are ever craving for some at home.

(Yields about 3/4 rice bowl portion)

Ingredients for sauce :
- 3 tbsp hei gor (shrimp paste)
- 2 tbsp tamarind paste
- 4 tbsp water (to boil tamarind with)
- 1 juiced calamansi lime
- 3 tsp sugar (or more if the sauce is too salty to your liking)
- 1/2 tsp chilli powder (or more if you like it spicier)
- 2 tbsp ground peanuts

Method :
- cook the tamarind paste with water for a few minutes. Set aside to cool. We will be using just the tamarind juice so do sift out the seeds.
- Scoop the hei gor into a large bowl, add chilli powder and sugar.
- Add the tamarind juice in halve portion first and do a test taste. Mix well and adjust to your liking.
- Squeeze the lime into the mixture and add the crushed peanuts. Continue to mix. The dipping sauce consistency should be just a little bit runny. Transfer to serving bowl.
- Top the sauce off with more ground peanuts before serving.


We have chosen our favorite ingredients here to dip with the rojak sauce - cucumber, mang kwang (turnip), you char kway and of course, the grilled cuttlefish. Other popular ingredients to dip with are grilled tau pok (beancurd puffs) stuffed with bean sprouts and cucumber, jambu (water apple), pineapple and even green mangoes. These would surely whet your appetite!

 Enjoy!

Till the next post, have a wonderful day!

AddThis

Related Posts Plugin for WordPress, Blogger...

.